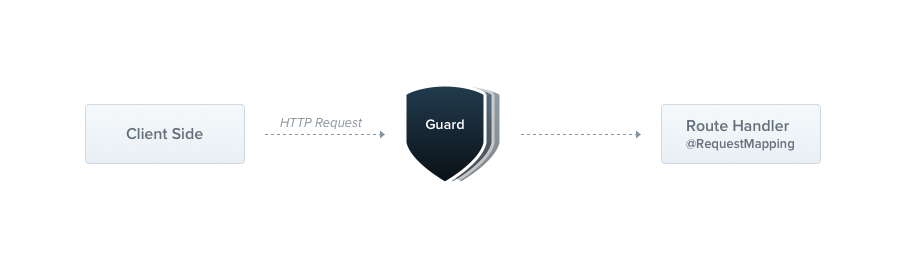
Nestjs에서 인증 및 인가, 권한 체크를 위해 Guard를 사용한다.
Express는 미들웨어에서 처리했으나 next() 함수 다음에 어느 핸들러가 실행되는지 알 수 없다.
하지만 가드는 ExecutionContext 인스턴스에 접근하기에 다음 실행 작업을 알 수 있다.
모든 가드는 canActivate() 함수를 구현하고 단일 인자로 ExecutionContext 인스턴스를 받는다. 불리언 값으로 리턴을 한다.
// roles.guard.ts

import { Injectable, CanActivate, ExecutionContext } from '@nestjs/common';
import { Observable } from 'rxjs';

@Injectable()
export class RolesGuard implements CanActivate {

  canActivate(
    context: ExecutionContext,
  ): boolean | Promise<boolean> | Observable<boolean> {
    ...
    return true;
    // return validateRequest(request);
  }
}
ExecutionContext
ArgumentsHost 클래스를 상속하고 있다.
ArgumentsHost 는 핸들러에 전달된 인수를 검색하는 메서드를 제공한다.
ExecutionContext는 현재 실행 프로세스에 대한 추가 세부사항을 제공하면서 ArgumentsHost를 확장한다.
ExecutionContext 를 통해 현재 실행되는 라우터 핸들러의 정보를 알 수 있다.

Binding guards
가드의 범위를 지정해줄 수 있다.
컨트롤러 범위의 가드
@Controller('user')
@UseGuards(RolesGuard) // 컨트롤러 전체에 가드 연결
export class UserController {
  constructor(private readonly userService: UserService) {}

  @Get()
  getHelloUser(
    @Query('name')name: string
  ): string {
    return this.userService.getHelloUser(name);
  }
}
메서드 범위의 가드
@Controller('user')
export class UserController {
  constructor(private readonly userService: UserService) {}

  @Get()
  @UseGuards(RolesGuard) // 해당 메서드에만 가드 연결
  getHelloUser(
    @Query('name')name: string
  ): string {
    return this.userService.getHelloUser(name);
  }
}
전역 범위 가드
async function bootstrap() {
  const app = await NestFactory.create(AppModule);
  // app.use(MiddlewareTest);
  app.useGlobalGuards(new RolesGuard);
  await app.listen(3000);
}
bootstrap();
모듈외부에서 등록되어 있기에 의존성 주입을 고려하여 모듈내에 가드를 바인딩 해준다.
@Module({
  imports: [UserModule, TestModule],
  controllers: [AppController],
  providers: [
    {
      provide: APP_GUARD,
      useClass: RolesGuard,
    },
    AppService,
  ] // main.ts 에서 전역으로 가드를 설정하지 않고 모듈에 설정해서 종속성 주입
})
export class AppModule{}
가드의 리턴값을 false로 해두고 실행을 한 경우 403 Forbidden 응답이 된다.

Setting roles per handler
라우터마다 권한체계를 다르게 하기 위해 (관리자, 일반...) 핸들러에 사용자 정의 메타데이터를 첨부한다.
@Controller('user')
export class UserController {
  constructor(private readonly userService: UserService) {}

  @Get()
  @SetMetadata('roles', ["admin"])
  @UseGuards(RolesGuard) // 해당 메서드에만 가드 연결
  getHelloUser(
    @Query('name')name: string
  ): string {
    return this.userService.getHelloUser(name);
  }
}
하지만 이렇게 라우터에 직접 데코레이터를 다는 것은 권장하지 않기에 따로 데코레이터 파일을 만들어 관리한다.
// roles.decorator.ts

import { SetMetadata } from '@nestjs/common';
export const Roles = (...roles: string[]) => SetMetadata('roles', roles);
@Controller('user')
export class UserController {
constructor(private readonly userService: UserService) {}
@Get()
@Roles('admin') // 생성한 데코레이터 첨부
@UseGuards(RolesGuard) // 해당 메서드에만 가드 연결
getHelloUser(
@Query('name')name: string
): string {
return this.userService.getHelloUser(name);
}
}
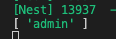
Reflector 헬퍼 클래스를 통해 라우터의 역할에 접근하여 핸들러의 roles를 출력해본다.
// roles.gurad.ts

import { Injectable, CanActivate, ExecutionContext } from '@nestjs/common';
import { Reflector } from '@nestjs/core';

@Injectable()
export class RolesGuard implements CanActivate {
  constructor(private reflector: Reflector) {} // Reflector

  canActivate(context: ExecutionContext): boolean {
    const roles = this.reflector.get<string[]>('roles', context.getHandler());
    console.log(roles);
    return true;
  }
}