모듈
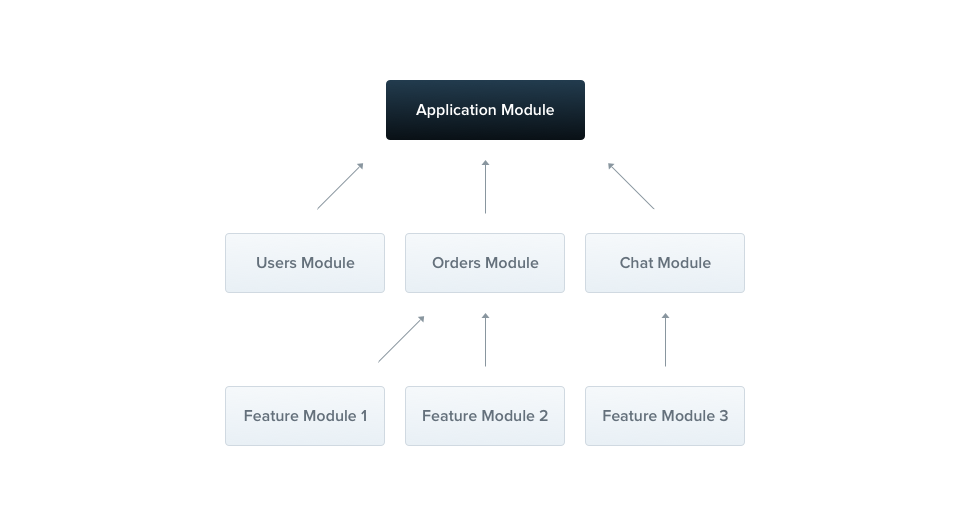
모듈은 여러 컴포넌트들을 합쳐서 더 큰 작업을 하게 한다. 모듈을 통해 동일한 기능을 가진 컴포넌트들을 합칠 수 있다.
그림에서 유저에 관한 기능을 가지고 있는 Users Module, 주문에 관한 기능을 가지고 있는 Orders Module 처럼 밀접하게 관련있는 기능을 모아준다. Application Module은 루트 모듈로 모듈을 사용하기 위한 시작이 된다.
모듈은 프로바이더를 캡슐화 해준다. 프로바이더를 내보내려면 따로 export를 해줘야 다른 모듈에서 해당 프로바이더를 사용 가능하다.
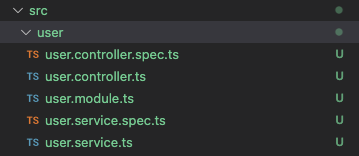
cli로 모듈, 컨트롤러, 서비스를 생성한다.
nest g module user
nest g controller user
nest g service user
user 라는 폴더가 생기면서 모듈, 컨트롤러, 서비스가 만들어진다.
spec.ts 파일을 생성하지 않으려면 --no-spec 옵션을 추가하면 된다.
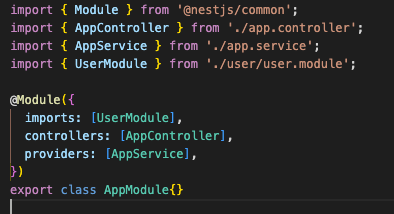
모듈을 생성하면 app.module 에 자동으로 imports 되어 있고 UserModule에 컨트롤러와 서비스가 자동으로 연결되어 진다.
정상적으로 연결이 되었는지 확인하기 위해 UserController.ts 에 서비스를 등록해준다.
import { UserService } from './user.service';
import { Controller, Get, Query } from '@nestjs/common';
@Controller('user')
export class UserController {
constructor(private readonly userService: UserService) {}
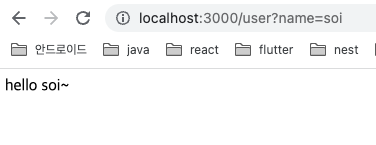
@Get()
getHelloUser(
@Query('name')name: string
): string {
return this.userService.getHelloUser(name);
}
}constructor(private readonly userService: UserService) {} 부분을 보면 생성자를 통해 서비스를 바로 사용할 수 있게 된다.
this 키워드나 따로 선언해주지 않고 바로 사용할 수 있다.
nestjs의 의존성 주입 때문이다.
UserService.ts 에 @Injectable() 데코레이터를 사용하면 의존성 주입의 대상이 된다.
그리고 UserModule.ts의 providers: [] 부분에 UserService 클래스를 추가해 줌으로써 의존성을 주입한 클래스를 사용할 수 있게 된다.
UserController.ts 에서 생성자부분에서 타입만 지정해주면 바로 사용할 수 있게 된다.
이제 UserService.ts 에 비즈니스 로직을 추가하고 테스트 해본다.
import { Injectable } from '@nestjs/common';

@Injectable()
export class UserService {
  getHelloUser(
    name: string
  ): string {
    return `hello ${name}~`;
  }
}
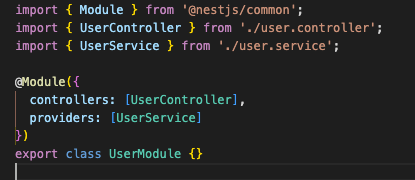
모듈을 공유할 수도 있다.
UserModule에서 export를 이용해 UserService 를 내보내준다.
import { Module } from '@nestjs/common';
import { UserController } from './user.controller';
import { UserService } from './user.service';

@Module({
  controllers: [UserController],
  providers: [UserService],
  exports: [UserService],
})
export class UserModule {}
UserModule을 import 하는 다른 모듈에서 UserService의 기능을 사용할 수 있다.
이렇게 모듈은 프로바이더를 캡슐화하고 있는 것을 알 수 있다.
다른 모듈을 하나 만들어서 UserService를 사용해본다.
import를 이용해 UserModule 을 추가한다.
import { Module } from '@nestjs/common';
import { UserModule } from 'src/user/user.module';
import { TestController } from './test.controller';

@Module({
  imports: [UserModule],
  controllers: [TestController],
})
export class TestModule {}
TestModule.ts 를 만들고 TestContoller.ts 에 UserService를 등록해준다.
import { Controller, Get } from '@nestjs/common';
import { UserService } from 'src/user/user.service';
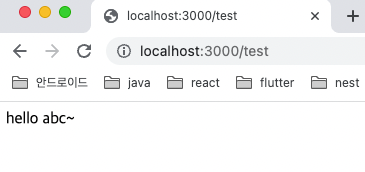
@Controller('test')
export class TestController {
constructor(private readonly userService: UserService) {}
@Get()
test() {
return this.userService.getHelloUser('abc');
}
}
UserService의 getHelloUser() 에 접근할 수 있다.
만약 UserModule에서 export를 하지 않거나 TestModule에 import 없이 사용하려고 한다면 오류가 뜬다.

@Global() 데코레이터를 사용하면 해당 모듈을 전역으로 사용할 수 있게 된다.
다른 모듈에서 import 하지 않고 바로 컨트롤러에서 사용이 가능하다.
import { Global, Module } from '@nestjs/common';
import { UserController } from './user.controller';
import { UserService } from './user.service';

@Global()
@Module({
  controllers: [UserController],
  providers: [UserService],
  exports: [UserService],
})
export class UserModule {}